How to Make a Robot Vacuum Cleaner Yourself – 2 Assembly Ideas
In today's fast-paced lifestyle, keeping your home clean isn't always easy. Modern technology can help. Robot vacuum cleaners have been around for over 15 years. They typically resemble a large puck that moves around the room according to a preset pattern or randomly (until it bumps into something) and collects debris. We offer two step-by-step instructions on how to make your own robot vacuum cleaner.
Materials for assembly
So, to assemble a robot vacuum cleaner, you need to understand its components, let's go through them step by step. It needs to move around the room on its own, so it needs motors—two to four, depending on the final design—as well as the ability to switch the direction of rotation and speed, which means you need a motor control board. If you're using DC motors, you'll need a board with four transistors (an H-bridge).
A homemade robot vacuum cleaner must detect collisions with walls and furniture. This requires obstacle sensors and limit switches on the "bumper." The working element—the vacuum cleaner—is also needed. It must be designed to operate on low-voltage DC power (e.g., 12V).
In addition to a vacuum cleaner, you need a rotating brush that will clean the surface, lift the rug pile, and sweep away debris. This requires one or two more motors.
A system that will control all of this. The simplest option is an Arduino board. Any board will do for this task; the Nano or Pro mini boards are the right size for the job.
Idea #1: A robot vacuum cleaner made from cardboard
The robot's base is made of thick cardboard. It's best to glue it together in a couple of layers, with the fibers aligned perpendicularly. For its technical components, you'll need the following set of parts:
- Any Arduino board.
- Breadboard or a simple breadboard, in principle you can do without it, just solder everything.
- 2 ultrasonic distance sensors (rangefinder).
- Vacuum cleaner turbine.
- A small motor or cooler from a computer.
- Motors with gearboxes and wheels.
- Engine controller.
- Wires for circuit connections.
- Batteries and charge controller.
The robot requires three lithium batteries to power it. Each has a voltage of 3.7 V. A controller is needed to charge them, such as the one in the photo:

Controller
To control the robot's drive motors, it's convenient to use a module based on an L298 microchip. This is an H-bridge circuit, and you can build it yourself from individual components, but buying a ready-made board is more reliable. It allows you to set the robot vacuum cleaner's speed and change its direction.

Control module
To regulate the speed, a PWM signal is applied to the ENA or ENB pin, and to set the rotation direction, opposite signals are applied to IN1 and IN2 for one motor and IN3 and IN4 for the other motor. If IN1 is at a logic 1 and IN2 at a logic 0, the motor rotates in one direction. To change the direction, swap the 1s with the 0s. It should be assembled with an Arduino using the following diagram (you can use any pins; you specify them in the sketch).

Arduino circuit
Next, you need to make a base out of cardboard and attach the wheels to it. You should get something like this:

Cardboard base
Here's a view from the bottom. Two drive wheels with an angular gearbox and a castor wheel:
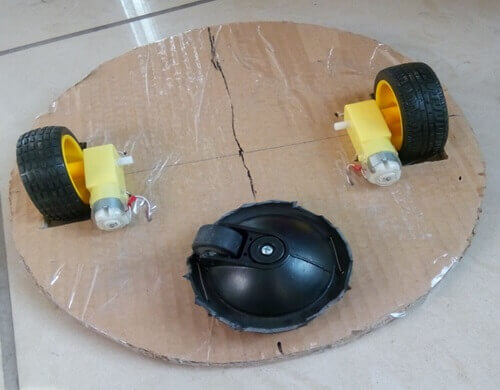
Wheelbase
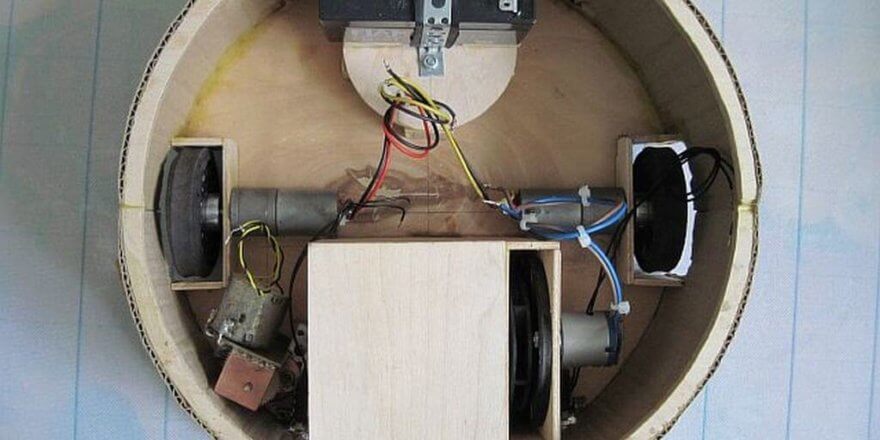
Now you need to assemble the circuit that will be mounted on the base. The base should be about 30 cm in diameter to accommodate both the electronics and the vacuum cleaner unit itself.

Assembling the case
Instead of rangefinders, you can use a bumper-mounted system connected to limit switches. Upon collision with an obstacle, the control system will signal a change in direction.

Bumper
You can also make contact bumpers yourself. You'll need a thin but rigid wire, such as a twisted pair cable. To do this, create a contact pad on the inside of the bumper using foil and secure the wire as shown below. When the robot vacuum cleaner collides with furniture or walls, they will make contact. Adjust the distance from the wire to the foil to achieve the desired sensitivity and prevent false alarms. 5V is applied to the foil, and the wire goes to the Arduino input, pulled to negative through a resistor of several kiloohms.

Homemade contact bumper
The device is powered by batteries; linear stabilizers such as the l7805 can be used to power the control system. A step-down converter, such as the LM2596, is suitable for adjusting the motor speed.
The hardest part is designing and assembling the vacuum cleaner. Here's a rough drawing:

Vacuum cleaner diagram
We break off the original fan blades and attach a vacuum cleaner turbine to its rotor. It's important to secure the turbine precisely in the center, otherwise you'll create imbalances and vibrations.

Robot turbine
This is what the back of the turbine looks like when attached to the cooler rotor. It can be secured with hot glue or superglue.

View of the turbine from the inside
That's all there is to it, a step-by-step guide to assembling a robot vacuum cleaner made from scrap materials. Its operating algorithm is as follows: the robot vacuum cleaner moves forward until it encounters an obstacle. After the collision (or approach, if you're using ultrasonic rangefinders), it stops, moves backward a predetermined distance, turns at a random angle, and continues moving.
Idea #2: An almost factory-like robot
We present to you a simpler robot vacuum cleaner project. Here's what it looks like when assembled:

Homemade robotic vacuum cleaner
The navigation system is assembled from a set of six IR obstacle sensors. In case none of them are triggered, two contact sensors (limit switches) are provided. The motor control system uses the same driver with an L298N microchip. To assemble it, you will need:
- Arduino board, originally Pro-mini was used.
- A USB-TTL adapter for programming this Arduino model. If you're using an Arduino Nano, you won't need it, as it supports programming via USB.
- Driver for L298N motors.
- Motors for wheels with gearbox.
- 6 IR sensors.
- Motors for the turbine (if possible, more powerful).
- Vacuum cleaner turbine impeller.
- Brush motors can be anything.
- 2 collision sensors.
Assemble all of this according to this scheme:

Robot vacuum cleaner assembly diagram
To assemble the power supply circuit of a robot vacuum cleaner you will need:
- 4 lithium batteries, 18650 type is suitable.
- 2 DC/DC converters (step-up and step-down).
- A controller for charging and discharging two batteries (search online for "2s li-ion controller"). The circuit uses a series connection of two parallel-connected cells, resulting in an output voltage greater than 7.4 V. The parallel circuit is used to increase capacity and battery life.
Here is the power supply diagram for this robot:

Power supply diagram
In addition, you will need plastic (PVC) or any other material for the robot body; you can print it on a 3D printer if you have such an opportunity.
This DIY project requires firmware. Here's an example of a random cleaning algorithm we found online. Download the sketch here: firmware for a robot vacuum cleaner.
This article discussed two robot vacuum cleaner designs that you can replicate and build yourself. You can build an automatic room cleaner for between $30 and $100. The most expensive components are the batteries, motors, and Arduino boards. If you've successfully built a homemade robot vacuum cleaner or come up with a different design, please share your examples in the comments. We welcome open communication!
Finally, we recommend watching these videos, which clearly demonstrate a few more ideas for making a robot vacuum cleaner at home:
Thanks for the article!
For your information, “dvigatelya” is not a word in Russian.
But this is just a cosmetic defect of the article.)
Hi, I'm Yuri, I'm finishing up a construction project, there's a sea of dust, I had the idea to make a robot vacuum cleaner, but I only know so much about electronics as I would in school. I looked at some materials, I liked the Meleon broom brush, if you put it on a robot vacuum cleaner, it will leave a small corner uncleaned, and the horizontal brush can be made any way you like.
Thank you so much!!! That's very clear! And how do I ensure the food is returned to the base?